Customize Secure Print Theme
The Secure > Theme tab on the web console allows you to customize the look and feel of your organization’s Secure Print components to match your company’s branding requirements. For example, you can replace the default logon screen on secure printers with your company logo and apply your company colors.
Note: You will need a license to customize Secure Print components.
The Theme tab is where you customize Secure Print elements:
- Change End-user portal logo or Favicon image
- Change Email template logo
- Change Secure Print printer user interface (e.g. login page, lock screen, etc).
- Edit the language labels on the Secure Printdevice
Changing the User Portal Logo/Favicon Logo
Administrators can modify both the logo image and the favicon image of the End-User portal through the Secure > Theme tab section of the web console.
-
Navigate to the Secure > Theme tab on the web console.
-
In the User Portal section select Logo Image or Favicon Image.
-
Click the Upload button. In the browser window that opens, select the image that you want to replace the original image with.
-
Click Save Changes.
Note: The recommended maximum size for the Logo Image is 240x70 pixels. For the Favicon image, the recommended size is 96x96 pixels.
Customizing the Email Template Logo
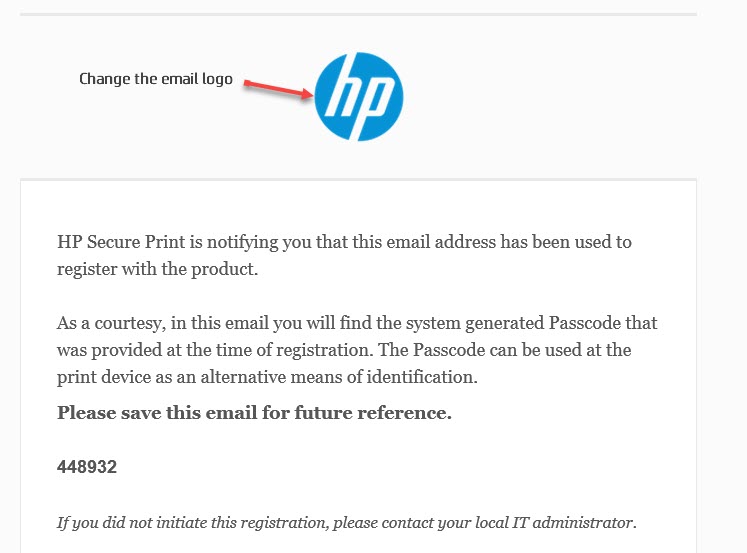
You can add your company logo to the email notification that users receive when they register to HP Secure Print(either via Open ID or Internal Authentication).
1. Navigate to the Secure > Theme tab.
2. In the Email Template section, click the upload button. In the browser window that opens, select the image that you want to replace the original logo with.
3. Save changes.

Customize Secure Printers
You can customize the following elements of secure printers' user interface.
- Lock Screen
- Login Screen
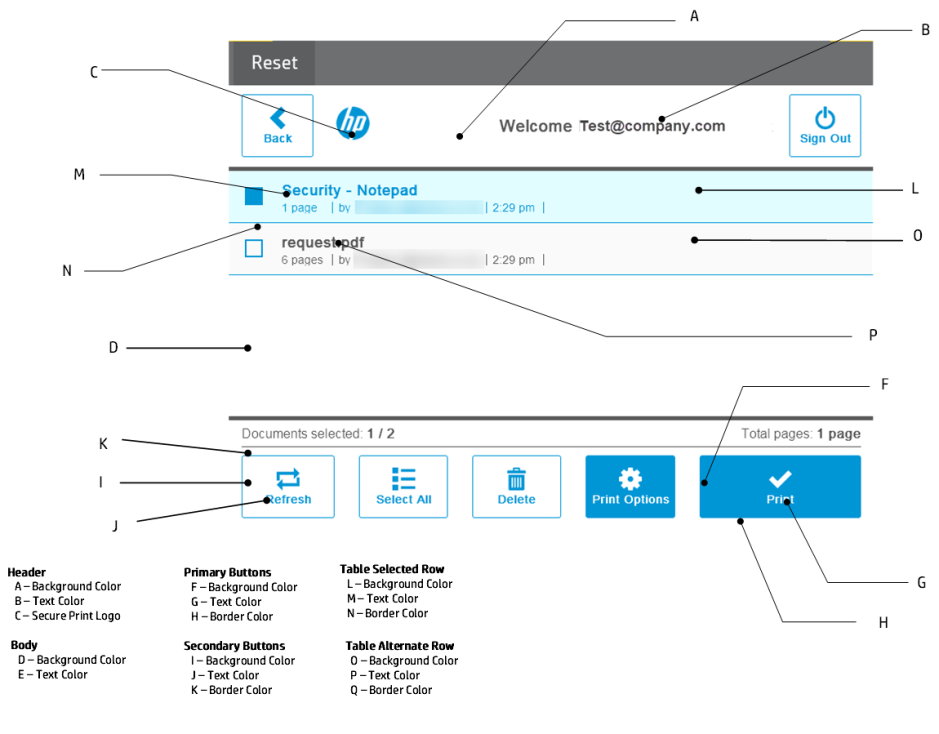
- Header
- Body
- Primary/Secondary Buttons
- Badge Registration
- Table
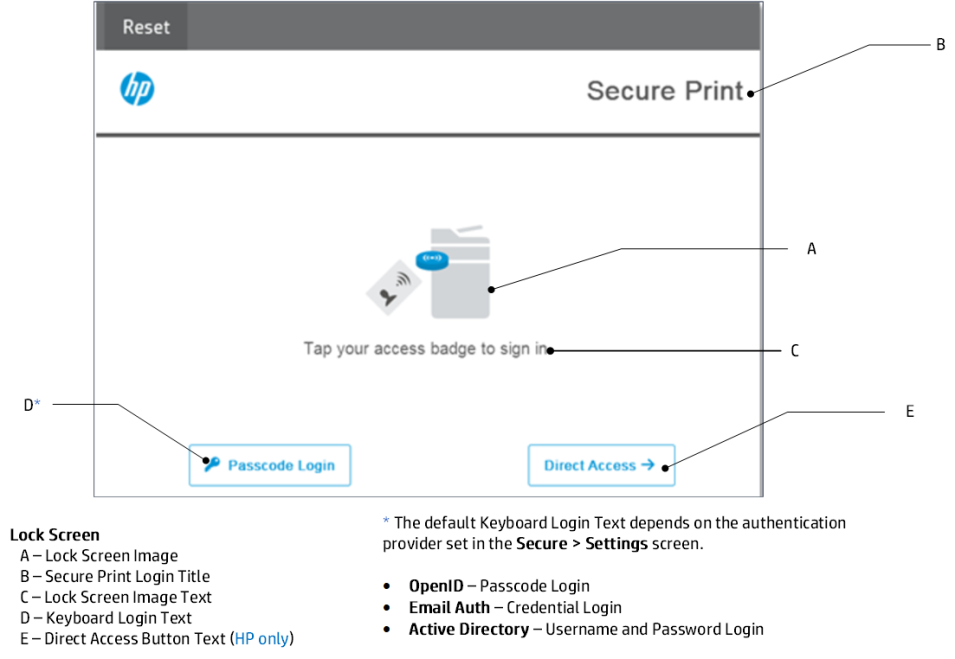
The following images show the elements on the secure printer screen that are affected by the theme settings in the web console.


1. Navigate to the Secure > Theme tab.
2. In the MFP > Lock Screen section.
3. Select the lock screen element you want to change.
- Lock Screen Image - Click the upload button. In the browser window that opens, select the image that you want to replace the original image with. Note: The max recommended size is 300 x 300 pixels.
- Secure Print Login Title
- Lock Screen Image Text
- Keybaord Sign In Text
- Direct Access Button
4. Save changes.
Note: If you've used the Device Scout to secure the printer, make sure that you have the latest version of the Secure Print Site Service. You can find the latest version of the Secure Print Site Service in this document.
5. Reset the Secure Print user interface on all affected devices by selecting the Reset button shown on the upper left corner of the printer screen.
Change the Secure Print logo
1. Navigate to the Secure > Theme tab.
2. Go to the Header section under MFP. In the Secure Print Logo field, click the upload button. In the browser window that opens, select the image that you want to replace the original image with.
3. Save changes.
Note: If you've used the Device Scout to secure the printer, make sure that you have the latest version of the Secure Print Site Service. You can find the latest version of the Secure Print Site Service in this document.
4. Reset the Secure Print user interface on all affected devices by selecting the Reset button shown on the upper left corner of the printer screen.
Changing the color scheme of your Secure Print device
1. Navigate to the Secure > Theme tab.
2. Select the Secure Print component (Body Background Color, Body Text Color, Primary Buttons, etc) that you want to change.
3. Click the Picker icon. This opens a color pallet. Select the color that you want using any of the following methods:
- Enter the 6-digit hexadecimal color code.
- Use the picker on the side to pick a color. Click away from the color palette to select the color.
4. Save changes.
Note: If you've used the Device Scout to secure the printer, make sure that you have the latest version of the Secure Print Site Service. You can find the latest version of the Secure Print Site Service in this document.
5. Reset the Secure Print user interface on all affected devices by selecting the Reset button shown on the upper left corner of the printer screen.
Editing the language of labels on the Secure Print device
You can change the language of the following text of your Secure Print-enabled printer:
MFP
• Secure Print Login Title
• Lock Screen Image Text
• Keybaord Sign In Tex
• Direct Access Button Text (HP Only)
Login Screen
• Password Login Label
Badge Registration
• Title
• Message
To change the language of a label:
-
Navigate to the Secure > Theme tab on the web console.
-
In the MFP, Login Screen, or Badge Registration section, select the label you want to customize.
-
In the drop-down menu found at the top of each label, select the language you want to edit.
-
Customize the text as desired.
-
Click Save Changes for the changes to take effect.
Note: When a language is selected, the web console will display default values for the selected language’s text label. For example, changing the Secure Print Login Title to Swedish displays the default Swedish values for each label. HP Insightssupports the following 12 languages:
-
Chinese (Simplified)
-
Dutch
-
English (default)
-
French
-
German
-
Italian
-
Japanese
-
Norwegian
-
Portuguese (Portugal)
-
Portuguese (Brazil)
-
Spanish
-
Swedish